Metasite creation guidelines: Unreal 3D Tech Art
Introduction: Basic Guidelines for Working in Unreal Engine to Create Metasites
Welcome to our foundational guidelines for working in Unreal Engine to develop Metasites. This document is crafted for those seeking straightforward, practical advice to navigate the initial stages of creating immersive and engaging digital spaces. Here, we will cover essential principles, workflows, and best practices to ensure your project starts on a solid footing. Whether you’re a beginner or looking to refine your approach, these tips will help you maintain efficiency, creativity, and a clear focus throughout the development process.
From asset management and scene organization to basic lighting and material setup, these guidelines are designed to help you build functional and visually appealing Metasites without overwhelming complexity. Let’s embark on this creative journey together, starting with the fundamentals.

Tech Art requirements for 3D Metasite Domains
- First main thing is to provide 30-30+ FPS. And it no matter where your camera stays in the domain scene.
- Domain UE scene should be created in UE 5.3 and upper version in future.
Requirements to UE Scenes
- Overall view of UE Scenes should be nice and real looking.
- It should be dynamic lights. No baking etc. Because in future there should be features of dynamic changes in day time and so on.
- GI could be Lumen or SSGI. Also depends how it looks and how it needs in exact case. Recommendation is to make obviously Lumen GI in interior scene.
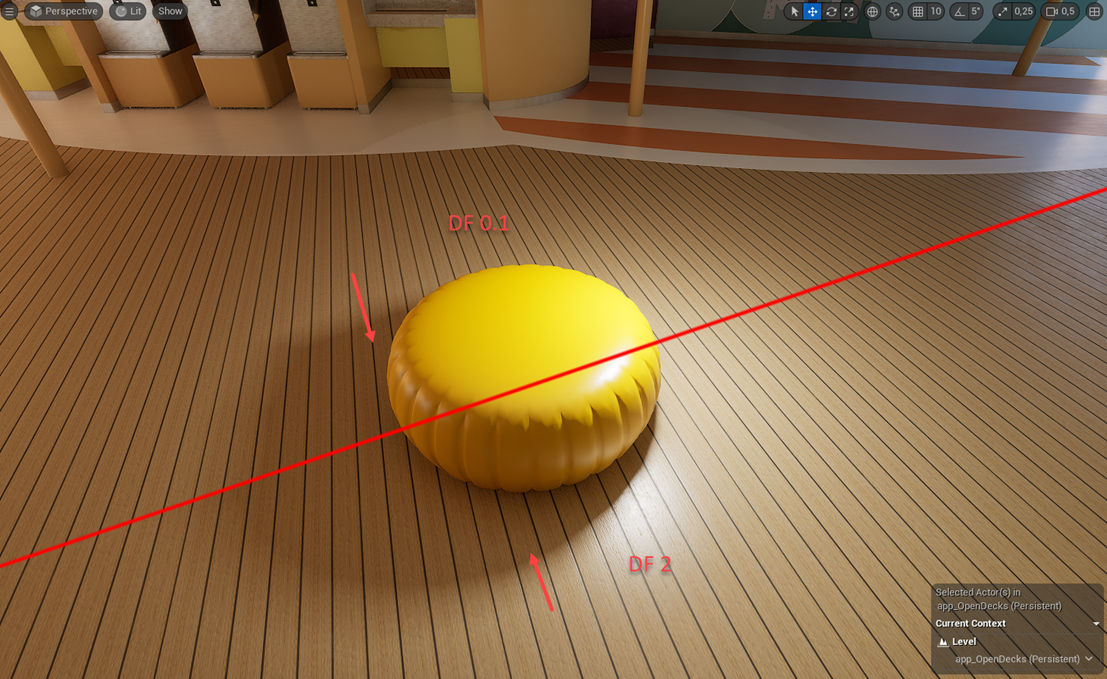
- Mesh Distance Field works perfectly with Lumen lights, so we recommend to turn on and correctly settle in property each of Static Meshes. For avoidance glitch etc. in ambient occlusion of this meshes and for keeping the shadows under the meshes in the far views. Also, when you will use Distance Field our recommendation is to split the big meshes into small one, it should help a lot.
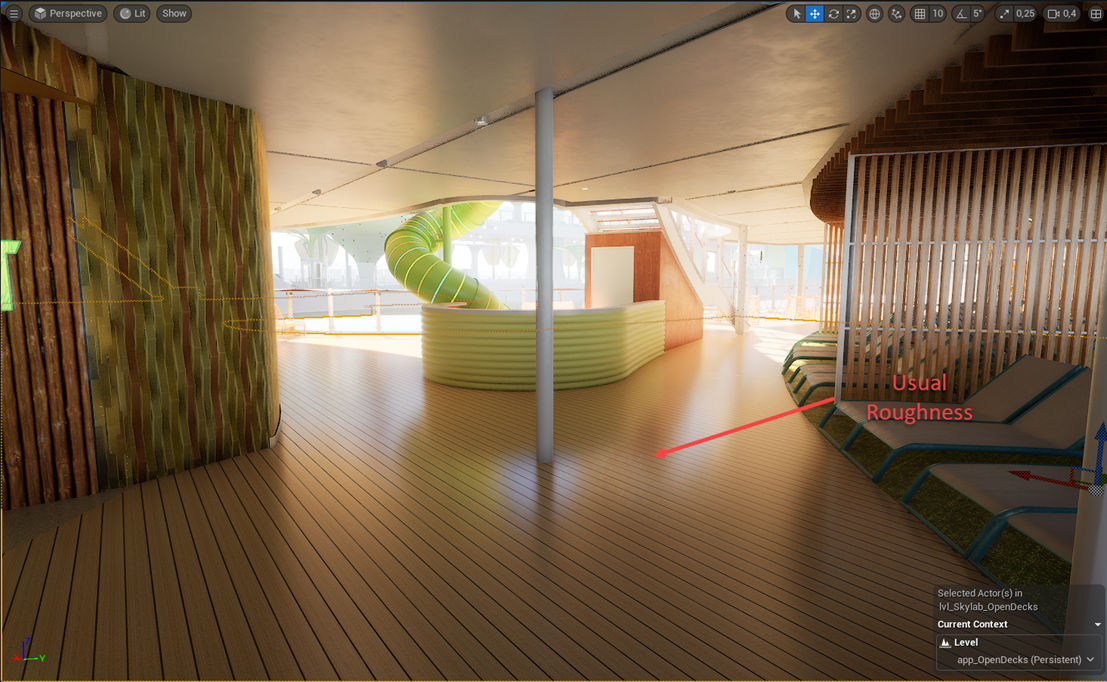
- Reflection could be Screen Space or Lumen. Depend on how it looks and how it needs in exact case. Recommendation is to make Lumen in interior scene. In UE 5.4 Lumen reflection is much better right now than it was in earlier version and not so blurry. So, you could use it from this and upper version. Also, don`t miss to choose lighting mode into Hit lightning, it will give you more precise results for reflections.
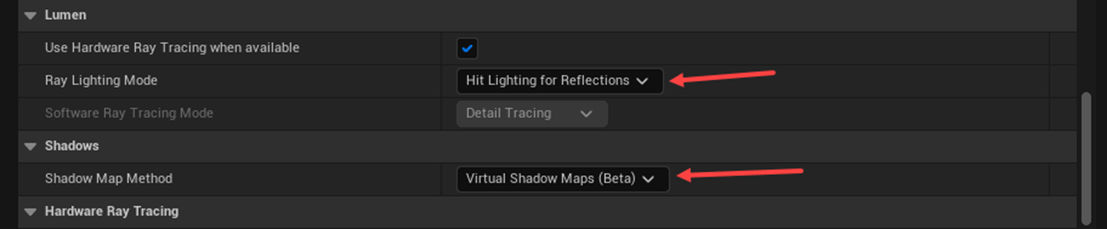

Please use virtual shadows instead of shadow maps. In version UE 5.3 they are much better and give more accurate results than usual shadows or distance field shadows.
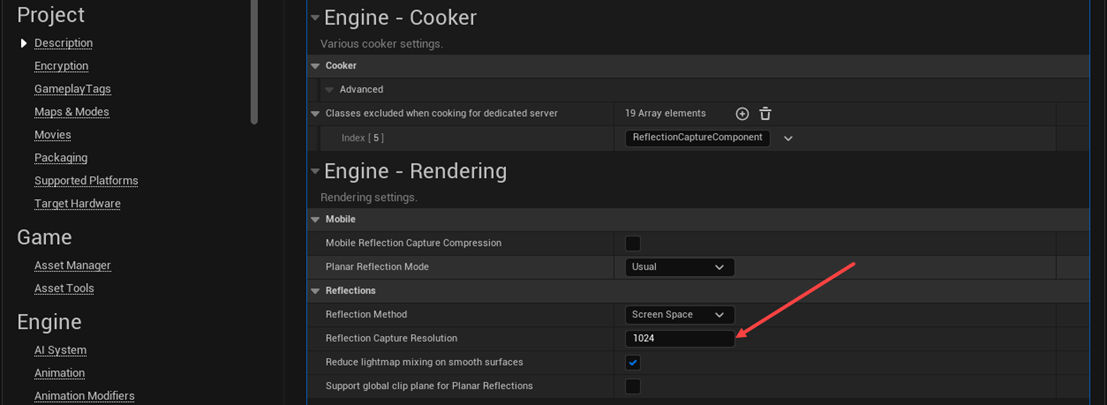
Reflection Quality could be 512 or 1024. Also depends how it looks and how is it needs in exact case.
We use DirectX 12 in our domain. It related with GameCast technology. So please be sure that your RHI and checkboxes is turn on into correctly setting. Be aware that shader formats for DirectX 12 could be SM6 considering the new technology in it.

Requirements to UE materials
Material quality should have all main maps. It regards diffuse maps, roughness maps, reflection maps, metalness maps and ambient occlusion (if it needs), normal maps. Better it will be to use one ORM map instead of using three individual maps.


Another example of using all these maps. Here we could see Subsurface maps also.


Also, you could use Decal materials if it needs. But not overlap it in one place more than two.
If there is some transition between two materials this transition should not be visible. You could use different techniques for this. Most popular could be to use vertex color etc. This case mostly is common for open world location, like transition between grass and soil so on.
Also, you could use fog, sky atmosphere and other visual effects but when it looks fine and improve visual component.
To get better optimization in scene we recommend to make one or more Master materials and use it as like a proxy for instance materials from it.
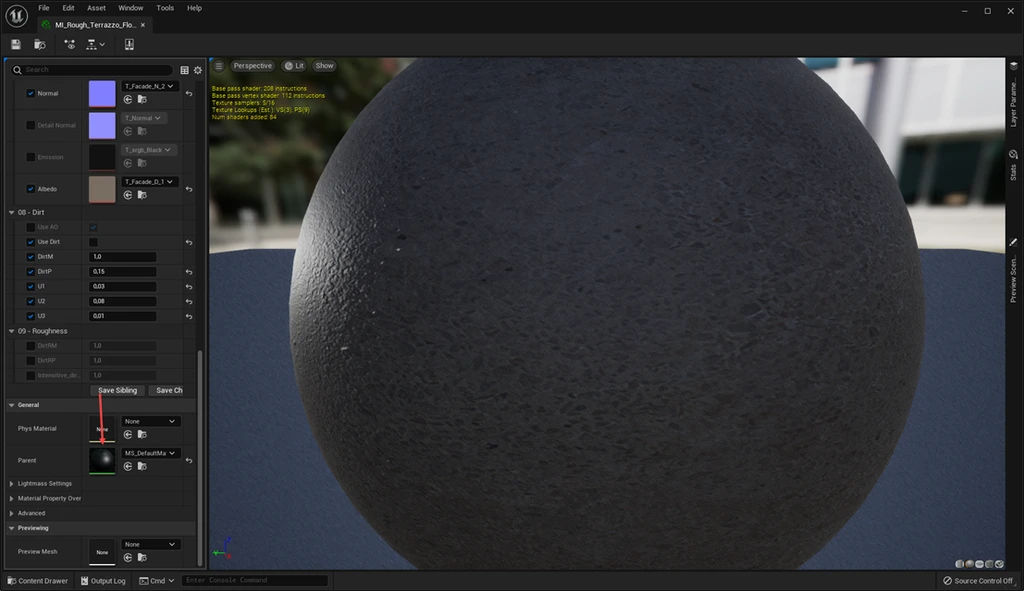
Material Instance:
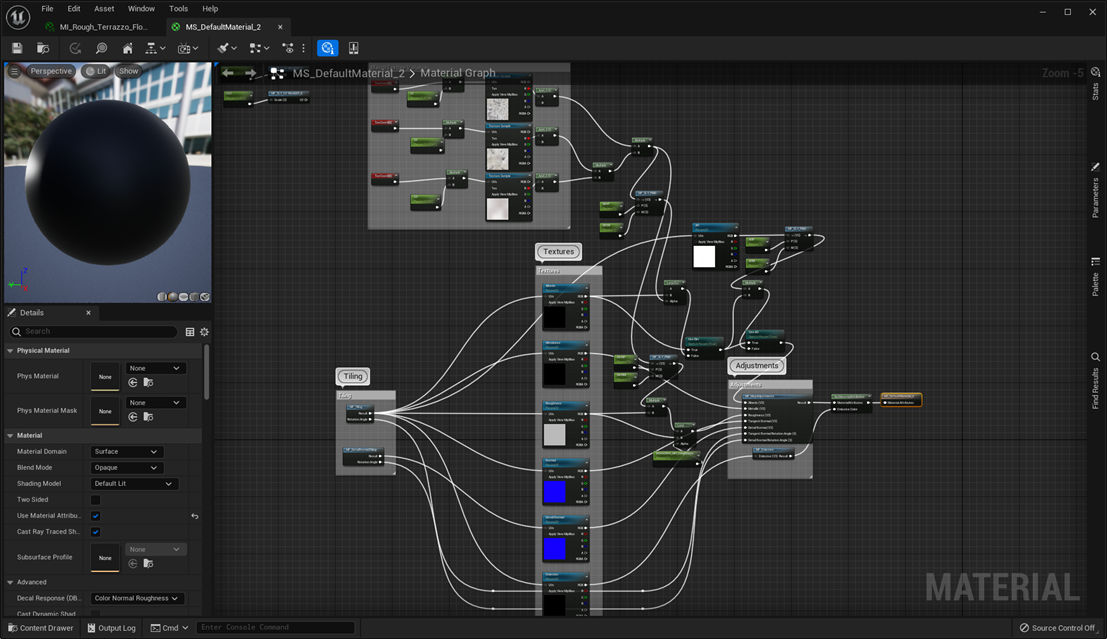
Master Material of this instance:
Try to use in Master Material the low amount of boolean switcher. It will significantly optimize your materials and didn’t give you additional load on your GPU where a big part of material’s logic just didn’t need. In this reason try to make one more Master Material with other settings etc.
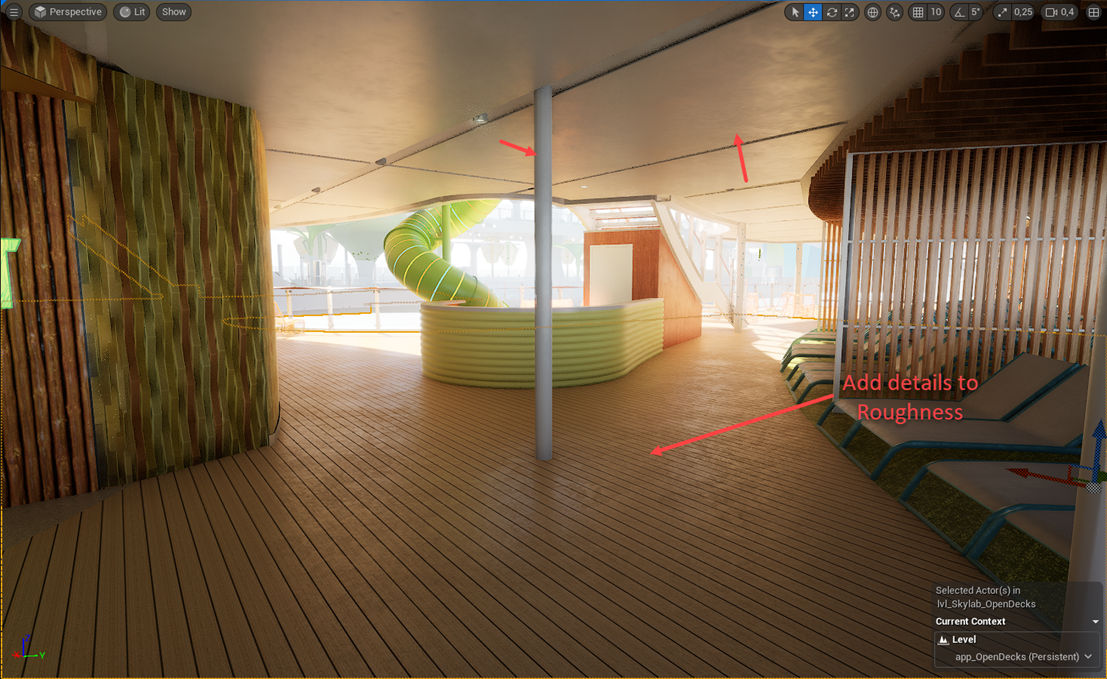
Add details to roughness. Even if the initial material seems smooth. Make-up those details if needed (i.e. some minor scratches, dust or just a little noise). This will make your assets stand out with the proper lighting.
Lack of Distance Field resolution in Static Meshes. If we use DF lightening be aware that your static meshes modeled in proper way and they didn’t have any holes and big parts etc. As like DF are working accurately only with volume meshes and not with surface.

Requirements to optimization in UE Scenes
- All material should be instance if it possibly to do. To get optimization in maps drawcall.
- All duplicate meshes should be instance in Scene. To get optimization in mesh polycount. (Recommendation could be to use Instance tool from UE market place).
- All duplicate meshes could be not just instances but also it should have properly mesh LODs on itself. Please check for correctly smooth working between switching LODs on distance. LOD 1 could have 50 % of origin meshes. LOD 2 could have 25 % and LOD 3 – (8-15) %.

From UE 5.3 and upper if it possible please use Nanite technology for heavy meshes, opposite it we could use the low poly meshes with normal maps. But just in case, when its not possible correctly optimize it in 3d editor or expedient to do this criteria or no possibility to use mesh LODs. In this example you could see some overall long assets, where its not possible to use LOD, because of overlapping its measure distance with the camera actor. Also, for good nanite optimization please use as less as possible materials IDs inside SM.
We could get some glitches with nanite SM, so if it happens please tweak value in fallback error settings.


If it possible please use streaming volume, cull distance or cull distance volume in your scene to get better optimization when we hide some not visible static meshes and lights in play mode.


Use texture size only in 8-bit draw on. Example: 256, 512, 1024, 2048, 4096. And not bigger then 4096. No need to get such huge texture load on memory RAM and GPU.
Use only HDRI maps and not EXR. HDRI could be more then submitted above dimension, but also in “double” 8-bit optimization.


All asset should have properly collision, where we get possibility to play mode in scene and didn’t go through the wall and props. Be aware do not make collision for doors where we could get stuck into.
Scene should not have the huge edge overdraw at the same place. You could check it in Quad overdraw view. Color region in red rectangle is unacceptable. To skip this problem just use LOD in static meshes, or custom LOD meshes at your notice.


Scene should not have the huge light overlapping at the same place. You could check it in Light complexity view. Color region in red rectangle is unacceptable.
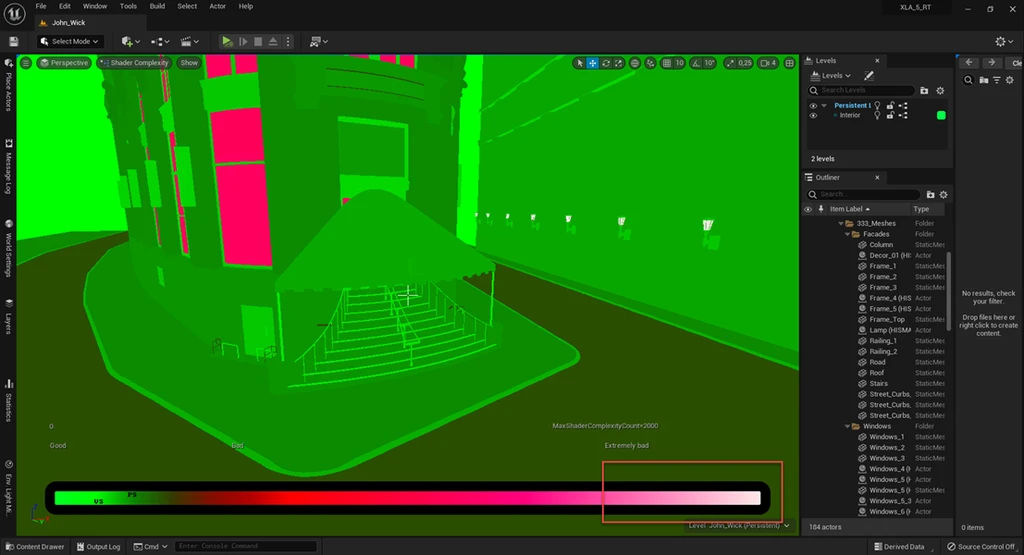
Scene should not have the very heavy material complexity. It could be acceptable only in transparence material as like glass, grass etc. You could check it in Shader complexity view. Color region in red rectangle is unacceptable.


Scene should have 30-30+ FPS.
For get more disk optimization on hardware spaces please do not reduce manually LOD Bias in textures. You could initially make the texture exact that measure what we expect. In some cases, this could reduce disk space even in double amount and give the same result for us.

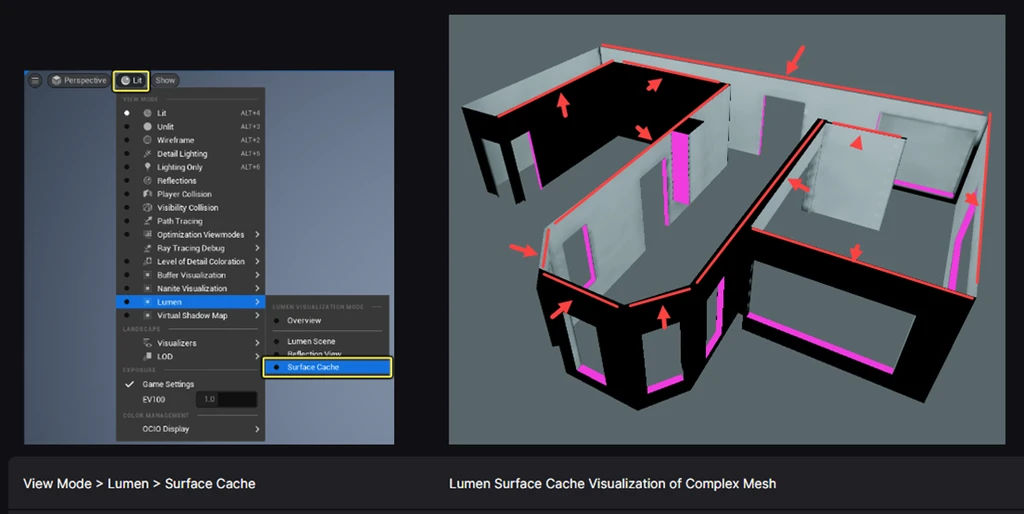
Lumen Surface Caches works with simple straight 3d meshes. We get glitches and bug shadows in Lumen lights, when we have implicit static meshes, such as: meshes with holes, bent meshes, twisted meshes, r-shaped meshes, s-shaped meshes. Try to make as straight as possible your static meshes to avoid these problems. Most of the time, helps methods where we divided complex meshes into small straight-line pieces.
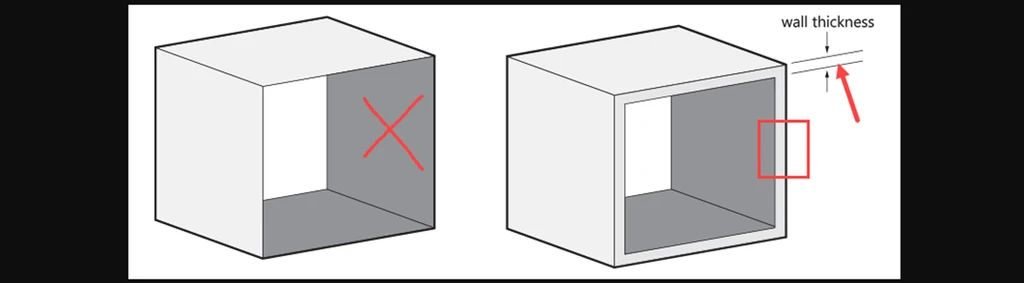
Another commons mistake is to make static meshes without thickness. In the future it gives for us the prominent Lumen lightworks problems. And all light setup will not be working correctly with such meshes.

Requirements to Light Setup
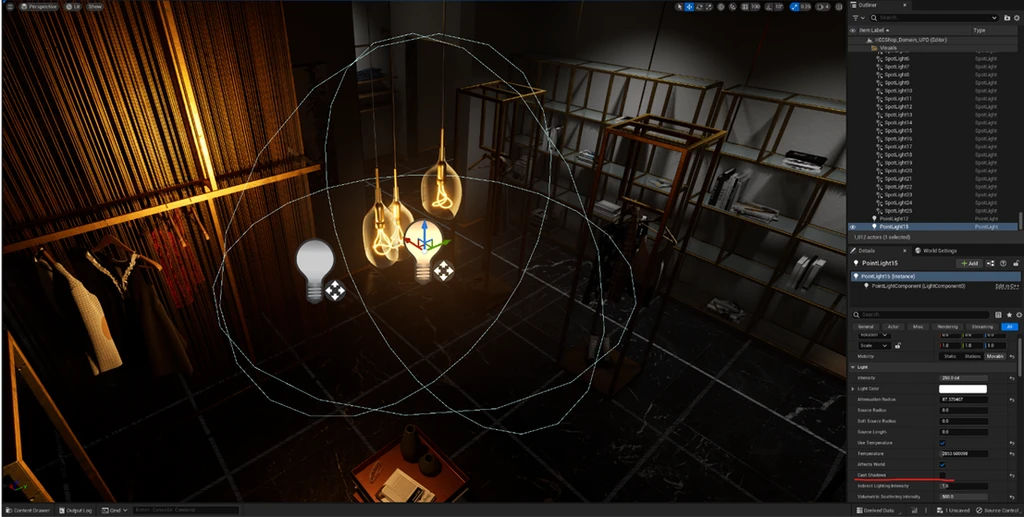
Some setups are impossible with a single light. Take a look at those Edison bulbs. When you put just one light right in the center of the group of bulbs (like previous examples mentioned) – you’ll get the positioning of the light right for really nice volumetric glow, but the lighting on the bulbs seems washed out, while background seems dull.
Single light source in the center of the bulb group.
We can experiment with the positioning of the light source to get some nice reflections while at the same time – giving more light to a nearby shelf which has some products in it. However, we are now having issues with volumetric glow unnaturally floating in space next to the light bulbs.
Light source position is shifted closer to the product shelf.

We can fix this and get the best of both worlds by splitting the responsibilities of volumetric lighting and actual surface lighting between two light sources. One additional light in the center of bulb group was added. It merely emits surface light, but instead emits a lot of volumetric lighting.
We will leave light that illuminates actual surfaces shifted away from the center of bulb group. This way we will ensure proper reflections on the glass (without a need for a special material) and ensure nice lighting for a nearby shelf. We need to set Volumetric Lighting Intensity for this light to 0 .0.
Then we will use a duplicate of that light with Cast Shadows turned Off and with much smaller radius to ensure good performance. Use much smaller intensity values as well. Here we've used 250 cd vs 6000 cd in this example. When tweaking secondary light intensity, you should mostly pay attention to a smaller and nicer reflections without washing out lighting on the glass. Try leverage maximum profit from non-shadowed light that you’ve already added to the scene. When reflections are good – start cranking up Volumetric Intensity on that light until you get nice soft glow you desired in the first place. Depending on the initial brightness of the scene you might want to get really high on this to get even slightest effect.

Secondary non-shadowed light with a minor intensity and small radius.
This can be achieved with a single light source with a Light profile or IES profile.
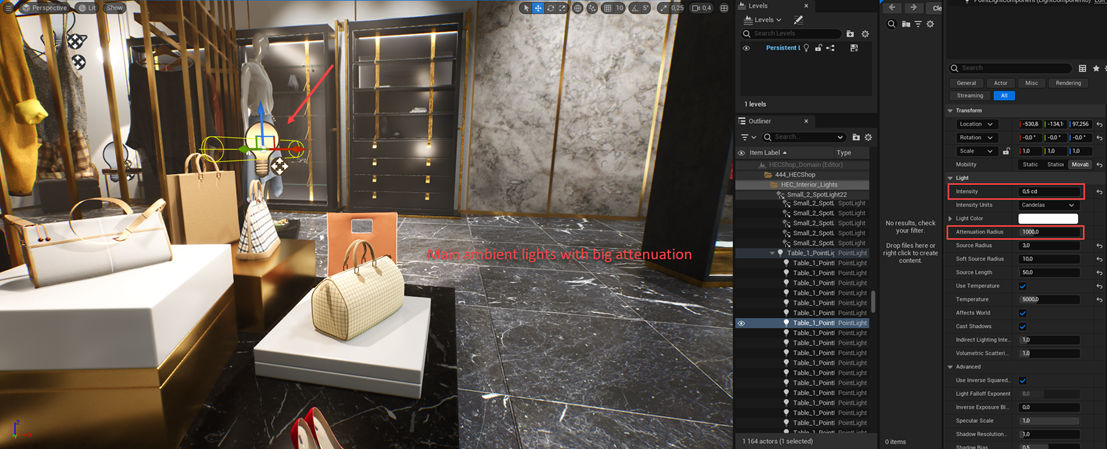
Also, essential optimization in lighting will be to use locally lights with bigger intensity but smaller attenuation radius, than to make a lot of lights which will overlap each other.
Local lightening.


Main ambient lights with big attenuation.
Bad example when we have a lot of overlapping lights. Try to avoid such situation.
Requirements to Props and Assets
- All props and assets should be low poly count. Not so to be ugly in 0 LOD but still should have Reasonable poly count. You could remesh it in prooptimizer or remesh tools it is not critical. But it should look on 0 LOD pretty.
- All props and assets should have appropriate UV unwrap channel. There is no need to do 2 nd channel, as like we didn’t bake the light, but still main channel should be clear and evident, without any overlapping and big free space on UVs.
- If we are doing assets for Domain Inventory. It should be low poly with normal map, AO etc. from high poly model. As like it acceptable for 3d models in GameDev.
- Also, all assets should have correct smoothing groups or hard edges.
Low Poly mesh with Baked Normal and AO.


Low Poly mesh.
Do not bake lighting, reflection etc into Albedo. Your light setup should do the job.

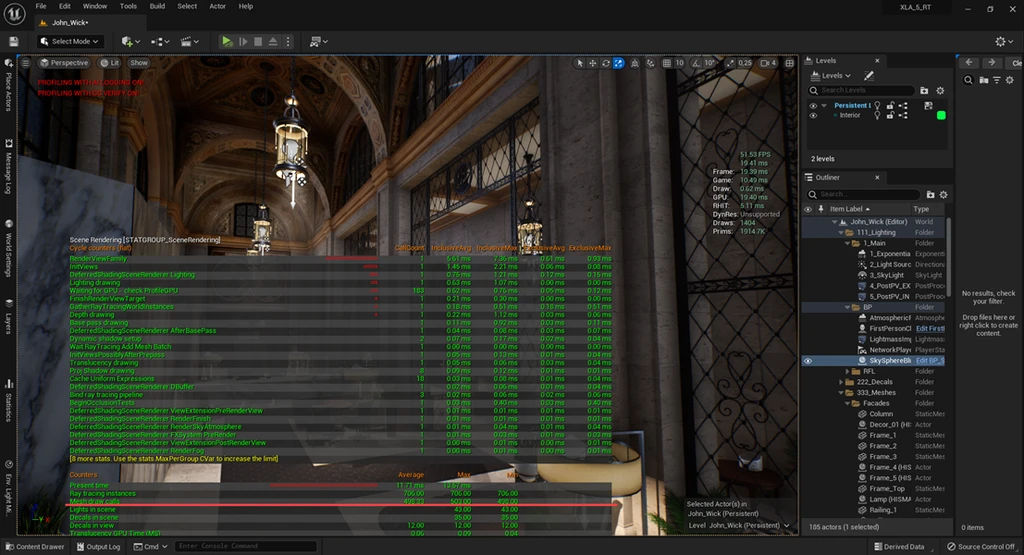
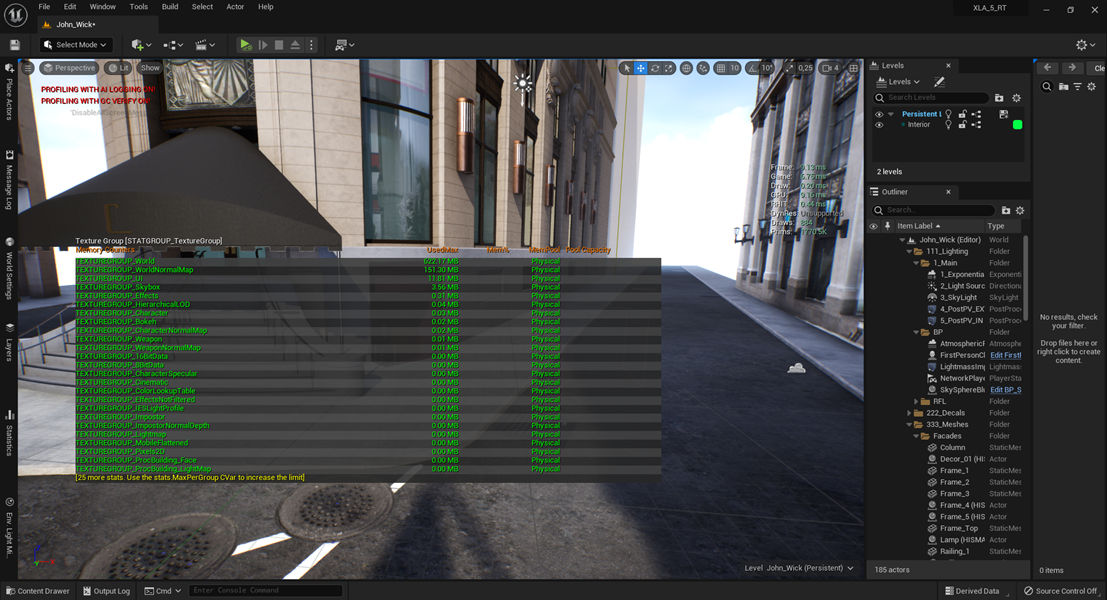
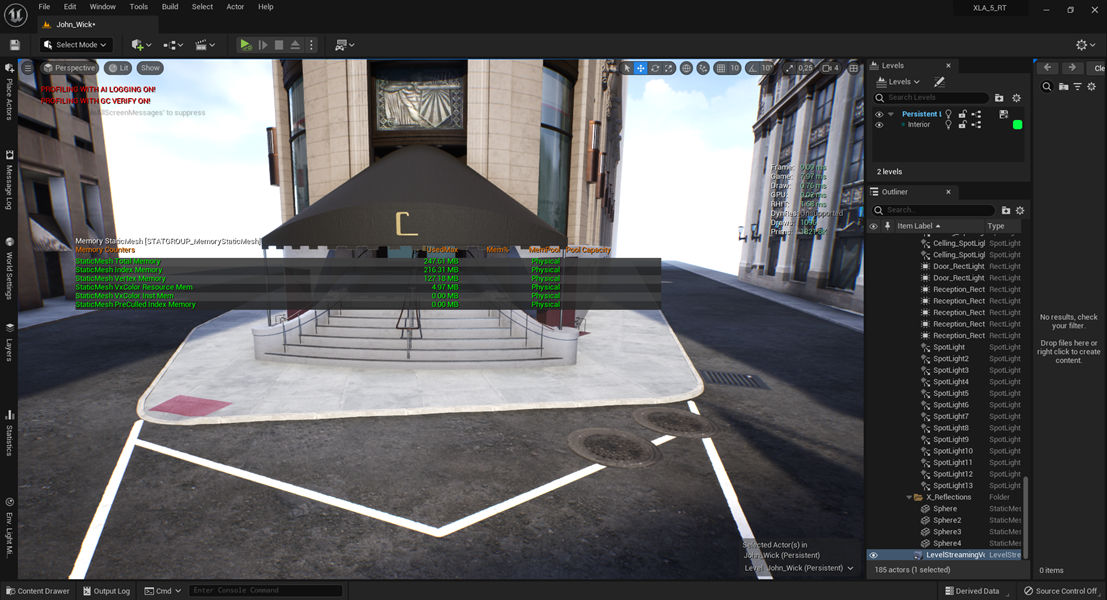
Requirements to STAT views in UE Scenes (are not critical for this case, just recommendation)
- Scene rendering – Please watch about drawcalls.
- RHI – Please watch about drawprimitives calls and load on texture memory.
- Texture Group – Please watch about load on texture memory.
- Engine – Please watch about frame time.
- Memory static mesh.
- Scene memory.
- GPU visualizer – You could check GPU load in GPU visualizer. Biggest line should be the lights as like this is dynamic Light scenes.
STAT views – This sample are just recommendation screenshot examples: